How did you start off the New Year? We were woken up by our alarms at 04:15. We needed to leave by 04:45 to reach a private car park by 05:15, catch a mini bus to the car park at the end of Mangatepopo Road and cross one of three volcanoes on a 19.4 km track, all before a potential storm was forecasted to arrive at 2 O’clock.

So what exactly did we do? Hubby and I went to the Tongariro Alpine Crossing in New Zealand and spent 8 hours testing the limits our bodies could endure. So let me tell you more about Tongariro and getting there. Volcanic peaks and diverse landscape ensure that this World Heritage site in the Tongariro National Park is one of the treks that you’ll be happy to have off your bucket list. It should have been on the list of free things to do in North Island, New Zealand.

A lot of weather information is available for the Tongariro Alpine crossing but this is still just a prediction. The crossing was closed a few days before and again after our crossing due to weather.
On the day it was predicted to have heavy rain and thunderstorms after 14:00 so we opted to leave as early as possible to avoid getting stuck. We reached the car park before sunrise and had beautiful views of the stars in the pitch black of the car park.
In our minibus, we only had one other group of 4 which surprised us. We opted for the earliest shuttle and expected it to be one of the busiest. I guess everyone else wanted to see the New Year in not by going to bed at 9 O’clock on New Year’s Eve. We let the other group go ahead of us as they appear younger and fitter than us and we didn’t want to feel rushed.


The first hour and a half is easy walking with mostly man-made tracks of loose gravel and plastic meshing to avoid excess track wear and tear. You follow a little stream for the majority of the track up to the Soda Springs so an easy walk if you wanted to take advantage of the 4 hour parking restriction they have now at both sides of the Tongariro Crossing.

The Mountains are considered sacred places so please avoid leaving rubbish (there are no bins on the crossing), drinking or swimming in the lakes or rivers and use the toilets that are provided along the track. Respect the culture and beliefs of the people in any place you visit.
You might also like:


After the Soda Springs you find information boards about what to do in the event of an eruption. Tongariro has two active volcanic vents, Te Maari Crater and the Red Crater. Mount Ruapehu summit is also a hazard zone with the main volcanic risk being lahar, fast flowing volcanic mud. This is caused due to the water in the crater mixing with the ash/snow/rock from the eruption and flowing faster than usual down the mountain valleys in a flash flood.
You pass a Lahar Hazard Zone towards the end of your crossing. Also, at this point an information board gives you another chance to consider if you should continue or turn back. From this point onwards the hiking steps up a level with steep ascents and numerous steps to get up to the South Crater.
By the time we reached the Soda Springs the sun had come up and it was looking like a beautiful day. Unfortunately, this was short-lived with cloud appearing by the time we made it to the start of the South crater.
We were hoping to make it to the summit before the clouds covered it but we still had another hour’s hike ahead of us before we got there. We could see the clouds pushing up the ridge on the left side as were we walking along the south crater.
Half way up the ridge the clouds made it over and covered the summit. Our views were limited for the next few hours due to the clouds and drizzle. Luckily the Emerald Lakes were still visible from the summit so we can’t complain too much.

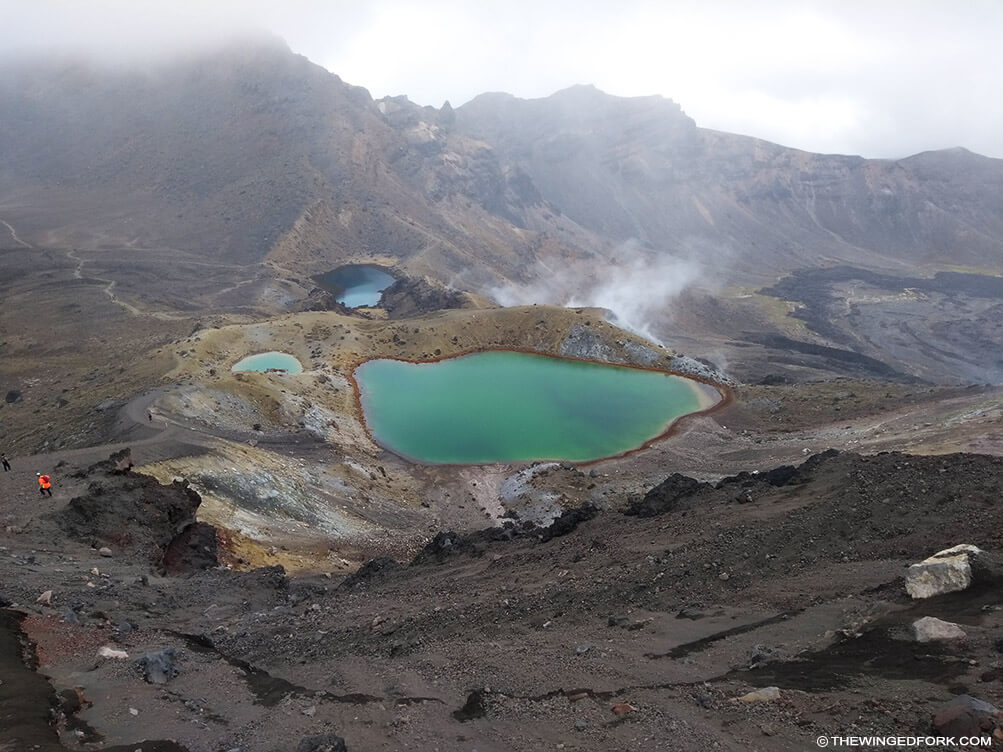
The way down from the summit is a steep down slope on loose volcanic gravel. It appears to have been a narrow ridge now worn down and widened by thousands of boots. With a lot of slipping, sliding and at points falling onto our bums we made it down to the Emerald Lakes. On the way down you can see some steam coming from the rocks (the Red Crater) and it hits home the warnings seen earlier on the route about what to do in case of a volcanic eruption.

After the steep descent you get a little rest with a level path (the Central Crater) taking you to the next ridge to climb up. Again there is no manmade path so in low visibility you can end up going the wrong way. On the right hand side you should have some great views of the Blue Lake. Due to the visibility we had we could just faintly distinguish some water if we looked intently.
About halfway up this ridge a fellow we saw at the summit walked past us the other way. We asked him if he’s going back up to the summit. He looked confused so we said we may be confusing him with someone else. It transpired later when he walked past us at Ketatahi hut that he was the same fellow and had somehow got lost on the ridge and ended up walking back to the summit by mistake.

As you get towards the top of the ridge the path appears to split in two, one going to the right of the ridge and the other to the left. We stood there for a bit trying to work out which way. If you look hard you would notice the direction poles lead off to the left but not easy to spot in these weather conditions.
After this ridge you wind your way down along the side of the volcano. The manmade path picks up again but the down slope really starts working on your knees and you would notice the more seasoned hikers are mostly jogging down the slope as this creates less impact on your knees keeping yourself at walking pace.

You finally leave the volcanic vegetation behind and start entering a more forest area and this is where you enter the Lahar Hazard Area. You follow and eventually cross over the stream before you get clear of this area. I have to admit that this last section feels like it never ends. By this point our knees were crying and a few blisters on our feet were making their presence known.

Clouds coming over Ngauruhoe. We had contemplated going to the summit of Ngauruhoe which add another 2-3 hours which means having to hike up loose volcanic gravel which I imagine would be similar to trying to climb up sand dunes. Also if you attempt the crossing from Ketatahi to Mangatepopo they advise adding another 2 hours to complete it. This way around would be more challenging as you are starting from a lower position and also hiking up this loose gravel is like taking two steps forward and one step back.
Some need to know and interesting information:
Car parking at the crossing has a 4 hour parking limit at both ends, so a shuttle bus is needed if you plan on doing the entire crossing. Shuttle buses run from different parking lots around Tongariro or from town centres and known accommodations. We booked a car park near Mangatepopo road end as we wanted to start early.

Distance of the crossing is 19.4 Kilometers or 12 Miles and will take 7-8 hours from Mangatepopo – Ketetahi. Add another 1-2 hours if you do it the other way around. There is the possibility to also hike to the summit of Ngauruhoe adding another 2-3 hours on to the crossing.
Tongariro National park is NZ’s oldest and a dual world Heritage site. It is home to the 3 mighty Mountains, Ngauruhoe (youngest Volcano, and Mt Doom from the Lord of the Rings. Reaching a height of 2,291 metres), Tongariro (at 1,967 metres) and Ruapehu (the Largest Mountain in the North Island at 2,797 metres).

Be aware that you are crossing active volcanic vents and even though they can measure activity an eruption can occur at any point. Information signs are provided on the track and might be wise to do a bit of research before you head off.
Pack sufficient food and water and ensure you have clothing suitable for all weather conditions even in the middle of summer. They have placed more toilets along the route so use these to avoid damaging the environment. As this is a sacred place for the Maori, respect it and do not drink the water from the rivers.
A breakdown of our timings compared to the advised timings:

Mangatepopo Road to Soda Springs – 1-1.5hrs (Easy)
Start: 05:45 End: 06:59 Total 1:14

Well laid out gravel path with plastic messing or boardwalk to avoid excess path erosion.
Soda Springs to South Crater – 40min-1hr (difficult)
Start: 07:00 End: 08:00 Total: 1:00

Start of the steep ascent with manmade steps and steep uphill parts
South Crater to Red Crater – 1 hr (difficult)
Start: 08:00 End: 08:48 Total: 00:48


Long stretch across the South crater (flat) before the more difficult ascent to the summit. No man made path with a section that has a metal rope to assist the ascent on the ridge.
Red Crater to Blue Lake – 30min (moderate)
Start: 09:02 End: 09:27 Total: 00:25

Steep Descent on loose gravel which is difficult and hard on the knees. A lot of slipping, sliding and falling during this part.
Blue Lake to Ketetahi Shelter – 1hr (moderate)
Start 09:27 End: 10:45 Total: 01:18


Be careful during the ascent as at a point the path looks like it splits in two. Follow the poles to the left. Then down to the shelter.
Ketetahi Shelter to Ketetahi Car Park – 2hr (moderate)
Start 10:45 End: 12:24 Total: 01:39

A long mostly downhill walk (hard on the knees). Landscape changes dramatically from volcanic landscape to entering a forest area with tall trees. A section of this path is private land so keep to the track.
Total Time : 06:39
Advise to allow 7-8 hours to do the crossing
Provisions taken:
Water: 4litres – drank 1litre and one bottle Gatorade. Due to the overcast and cool conditions we didn’t drink that much. During hot and sunny days you will drink more water.
Food: Bananas, carrot cake, chocolate biscuits, marshmallows, plums. Mostly all eaten.
Clothing: Jeans, T-Shirt, Hoody and Ski Jacket. As the weather can change in an instance it is advisable to prepare for all. Unfortunately, we didn’t have water proof trousers so it became a bit uncomfortable but manageable.
Other Posts About Australia and New Zealand
- 7 Off-Beat Things to Do In Wanaka, New Zealand
- 12 Quintessential Things to Do in Brisbane from a Local
- Things to do in South Australia
- What to look for in a camera
- What To Do In Wagga Wagga, Australia


Hey this is paps, this is my blog, Here you’ll find stories from my travelling log; I’ve been to places but not a lot, These are stories of what I’ve seen and thought; Small tales of places I’ve been to, So go on have a browse, have a read-through.
By the way, I blog along with my wife, The Soz, who often takes to the skies. However the majority of the time these gravity defying feats are for business and not pleasure. Although she flies a lot for business, it does not stop her from flying once again to go where no Soz has gone before.
Saying that… reading about us is not as interesting as reading about the places we’ve been. So scroll on down and let the adventures begin.
Hey Oliver. We did the crossing on the 1st of Jan 2018. The metal ropes were on the ascent of the red crater ridge up towards the summit. Can’t wait to see pictures of the rerouted or amended section. I can’t stand those inconsiderate music playing people either . . That’s the reason headphones/earphones were invented. Weren’t they? As for starting at 5 am, it was a pain on New Year’s Day but seeing those stars in the dark of night and the sunrise as we started the walk was definitely worth it.
When (what year) did you do the walk? – just finished doing the Tongariro Circuit this weekend, and was blessed with great weather. The downside being so many walkers along the Tongariro Crossing section it took away a bit from the experience. Especially when some hikers felt the need to blast music from their backpack 🙁 Anyway, the section where there are ropes seems to have been re-routed or “upgraded” from what I can see in your photos. Will add my blog post & photos once I’ve written it to compare! Great walk, and great idea to start at 5am before the crowds!!